(Manual) Navigational Map with plotting tools
[b]Version: 1[/b]
Description:
This is a map plotting tool. It will not show you where you are, the whole point is for you to navigate where you are with the help of this map. You can plot your routes measure distances, place markers, lines and circles to aid with your planning. Perfect for a build who is ment to be part of history where fancy GPS's did not exist yet! The UI is designed to not look like a display but an actual map (within the limitations that it is a display) to instill an emersion for the historical enthusiasts.
Features:
[list]
[*] Map Panning
[*] Map Zooming
[*] Focus map to coordinates
[*] In scale map scale
[*] Grid system mimicing the M-button map
[*] 4 plotting colors Black, Red, Green & Blue
[*] 3 plotting tools, lines, marks & circles
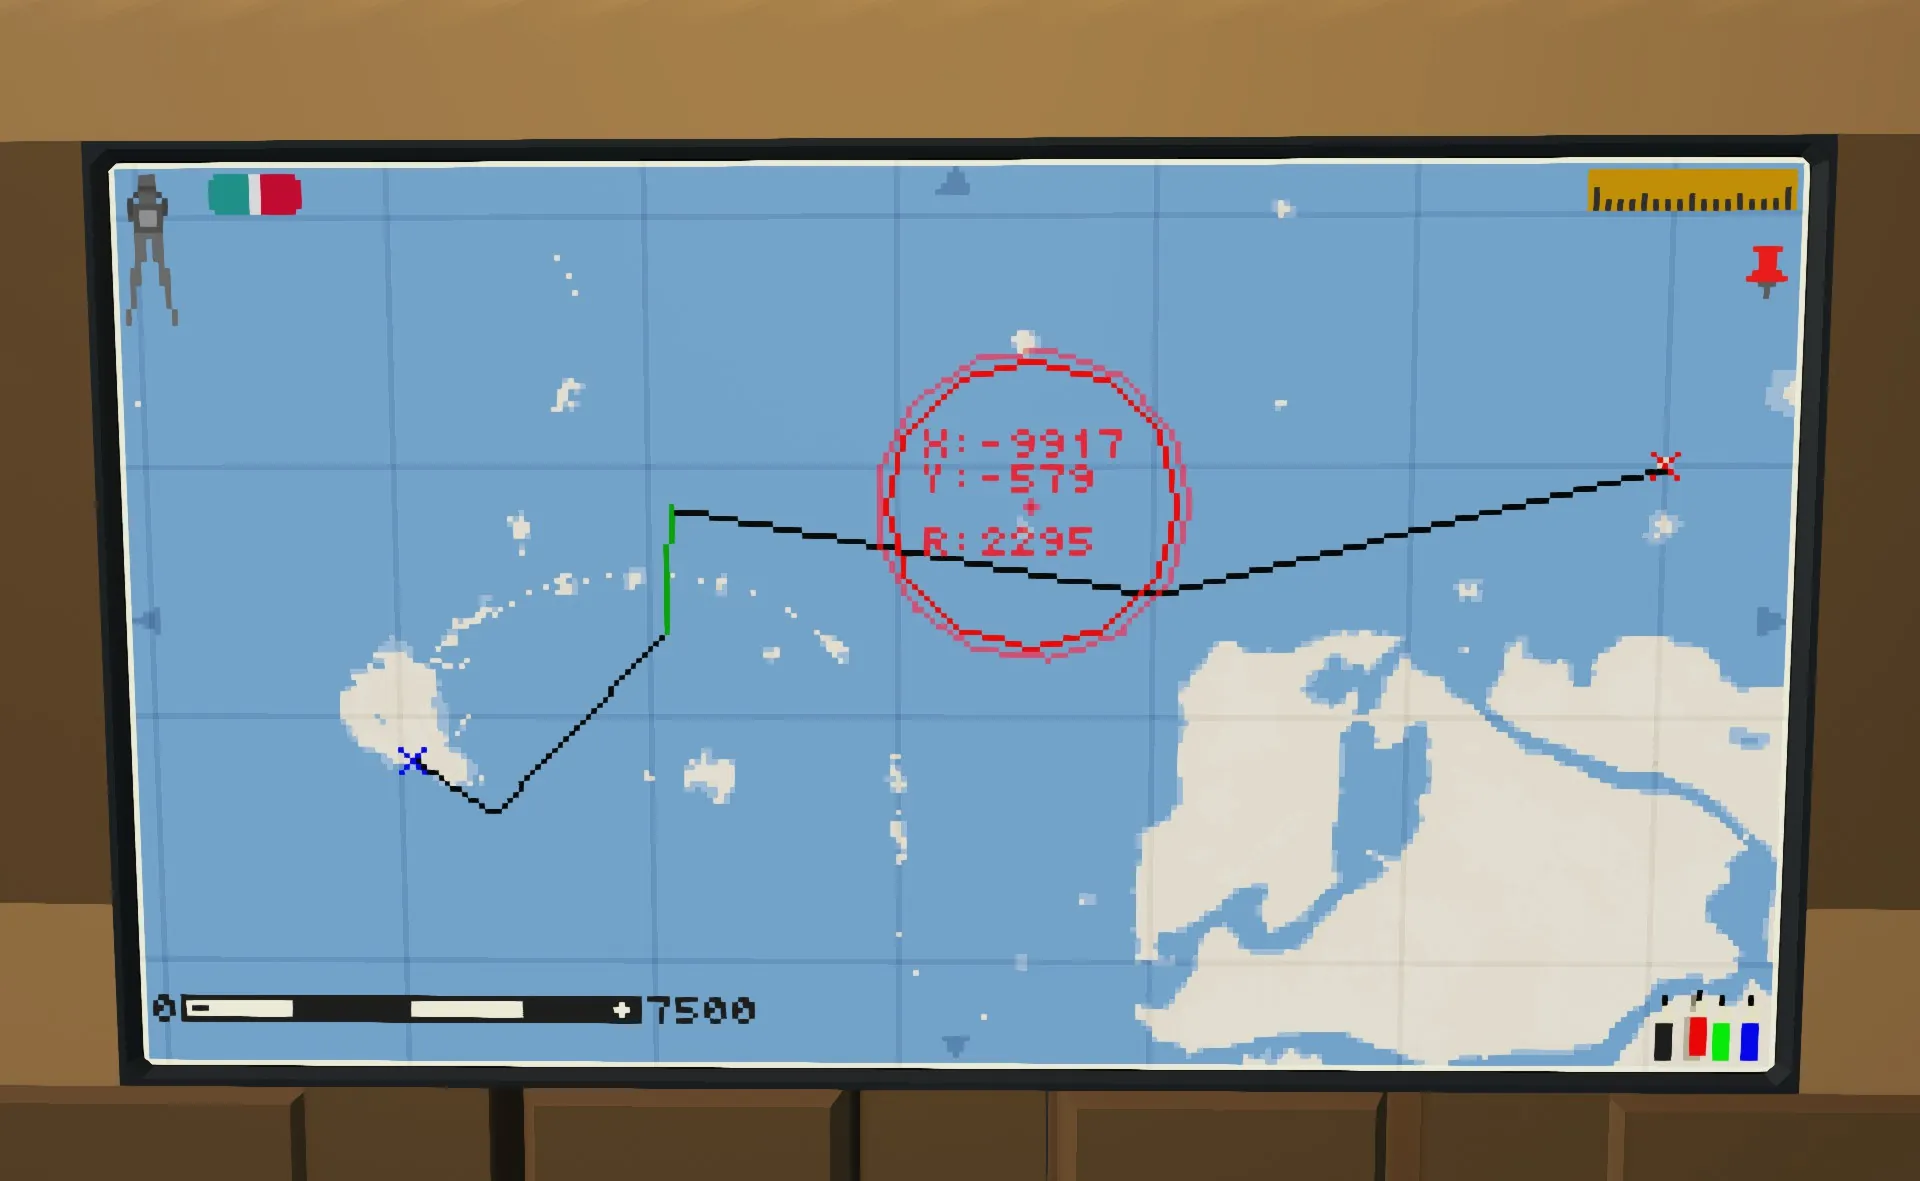
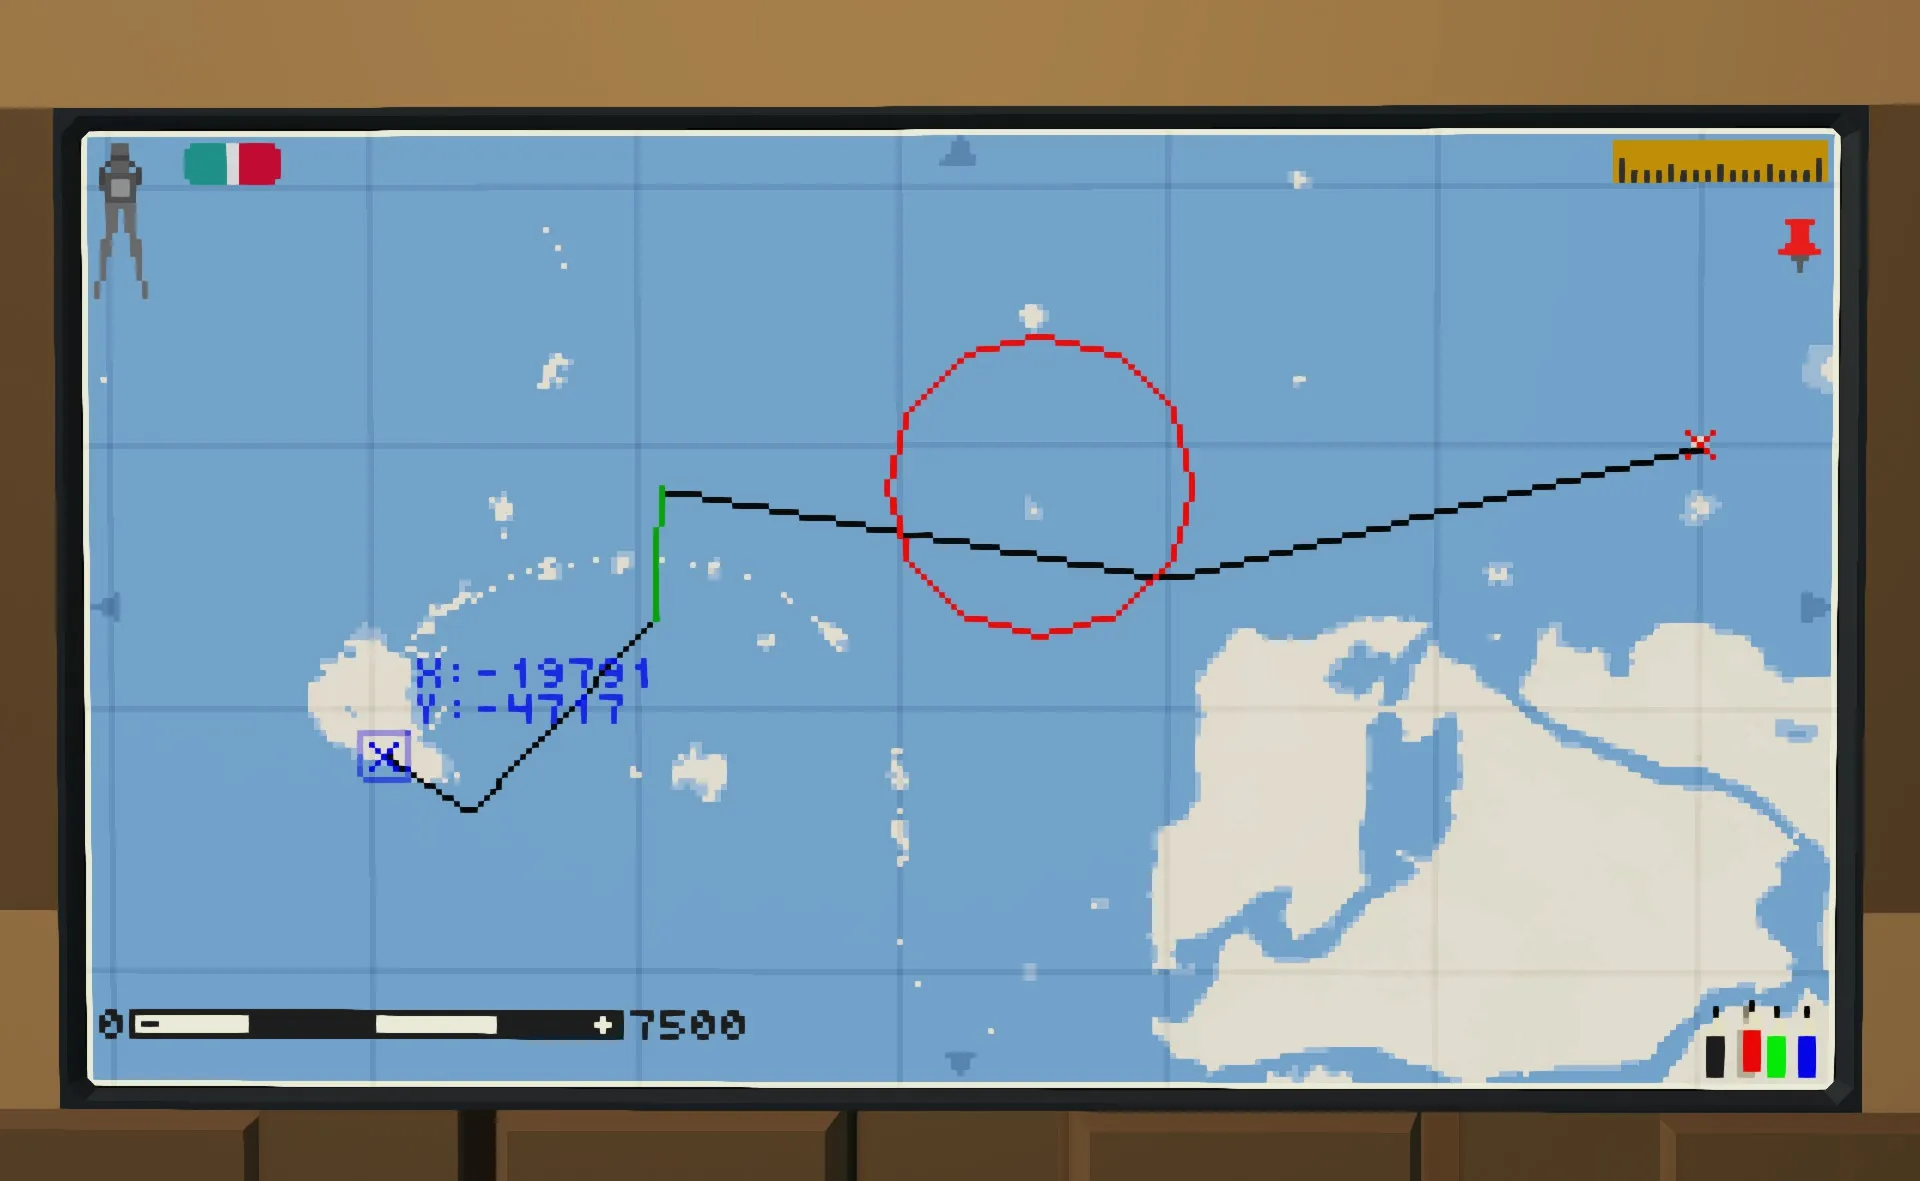
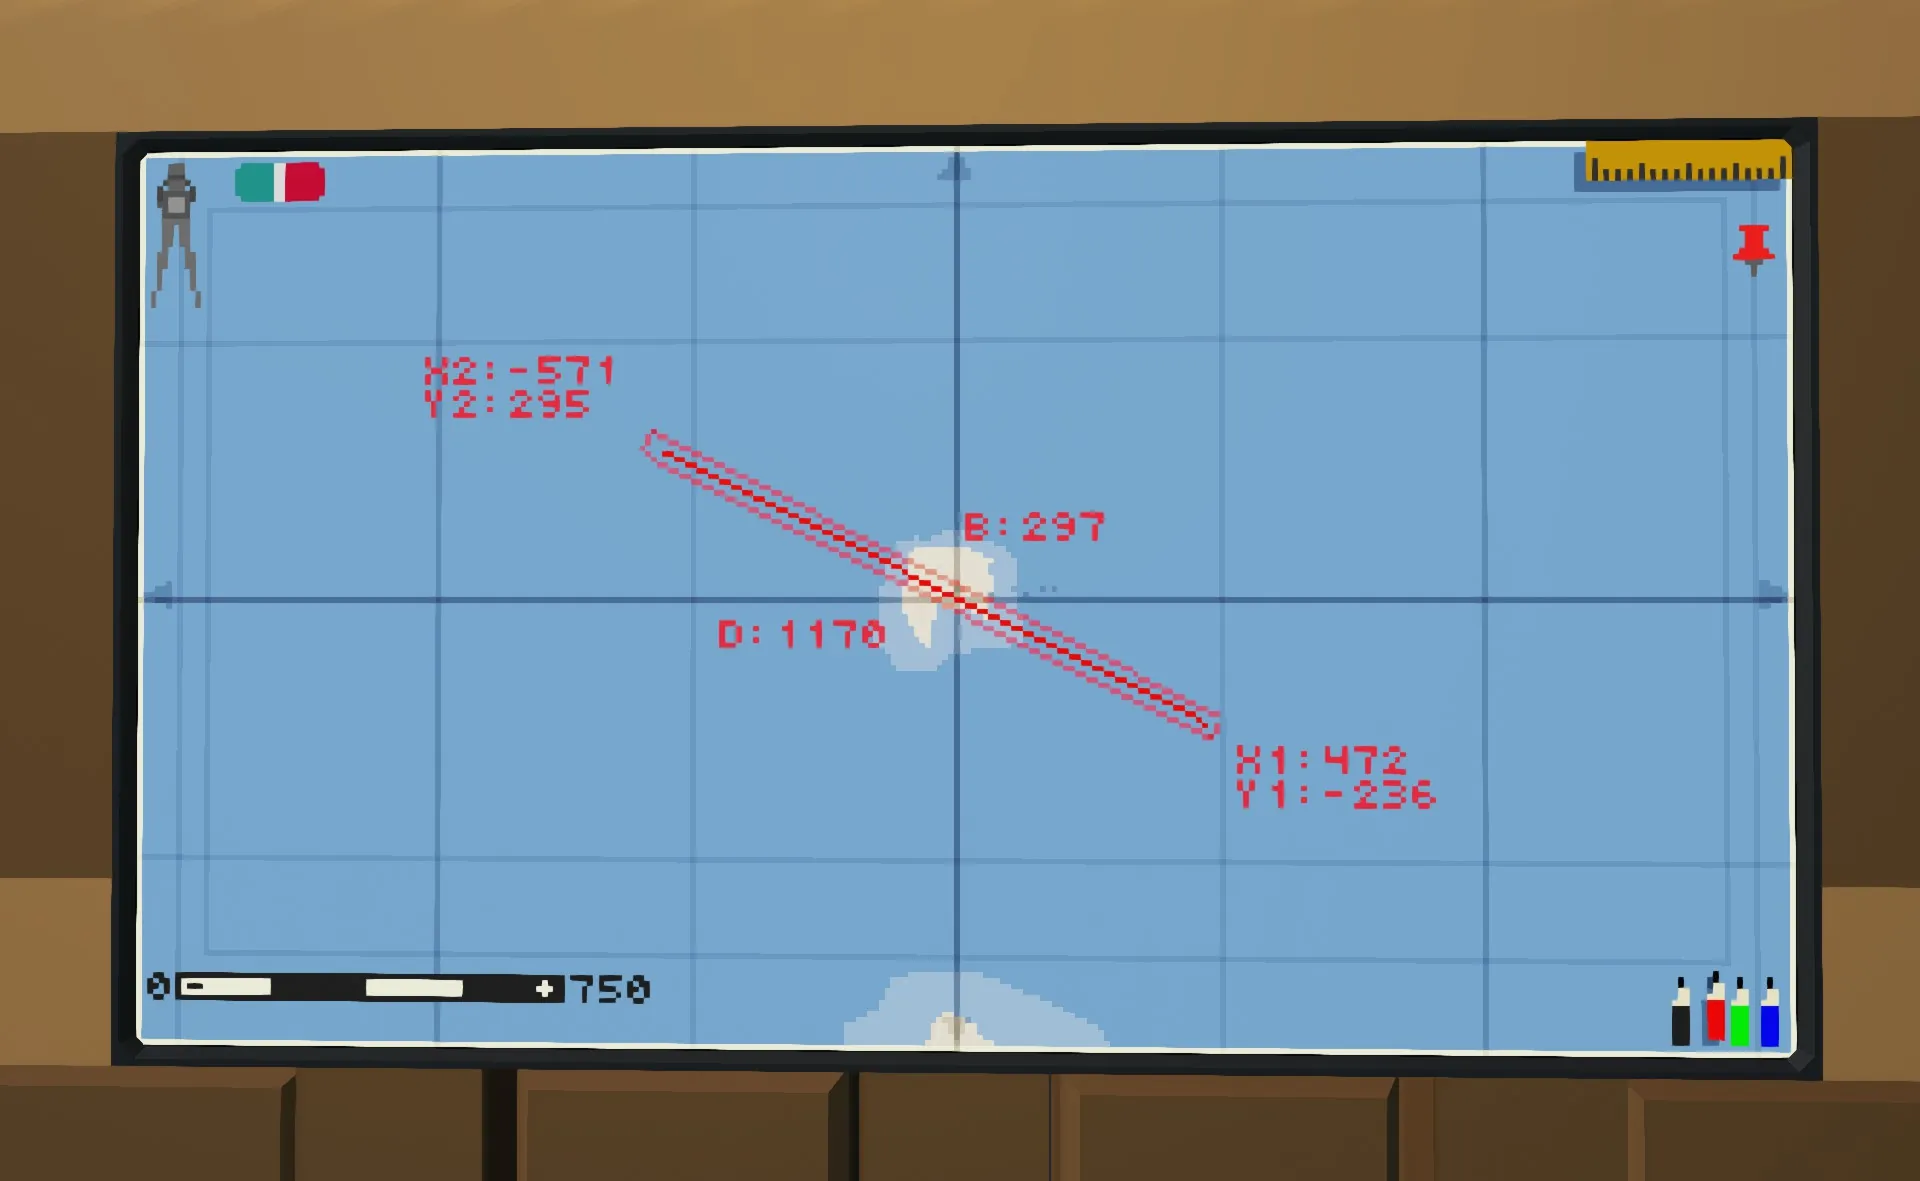
[*] Plotted element data: coordinates, lengths, directions, radius
[*] Plot element selection
[*] Eraser
[*] Display compatibility: 2x3, 3x3, 5x3 & 9x5
[/list]
Input Output Nodes Legend:
[b]Required[/b]
[list]
[*] Composite Display - Connected to the display that you want to be able to draw with
[*] Video Display - Connected to any display to show the map
[/list]
[b]Optional[/b]
[list]
[*] Target Coordinates Updated - Connected to a keyboard to set accurate coordinates for the drawing tools
[list]
[*] Target X - X Coordinate, must be connected to Keyboard output A
[*] Target Y - Y Coordinate, must be connected to Keyboard output B
[/list]
[*] Range & Bearing Updated - Connected to a second keyboard to set accurate dimension data for circles and lines
[list]
[*] Range/Radius - Sets a line length or a radius for a circle. can be connected to any keyboard output
[*] Bearing - Sets a lines bearing to be drawn, but must be combined with a range. can be connected to any keyboard output
[/list]
[/list]
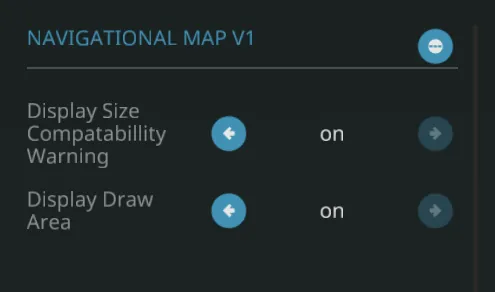
Microcontroller Configuration Panel Legend:
[list]
[*] Display Size Compatibility Warning - If you insist on using a display smaller than recommended, then you can disable the warning message at your own risk.
[*] Display Draw Area - If you want to hide the drawing area box. Its not recommended as you might not know exactly where the display will accept your clicks
[/list]
Installation:
[list]
[*] Place the microcontroller on your build
[*] Edit the micro controller
[*] Move the nodes out of the Micro Controller white box that you do not need for your build and resize it to only contain the nodes you want.
[*] Update the micro controller with its new dimension and node changes
[*] Adjust the MC configuration panel to your preference.
[*] Connect all the nodes you chose to include (* are mandatory)
[*] (Optional) Place down keyboard(s) (1 to 2) for accurate coordinates and data when drawing
[*] Make sure your display have power and is turned on.
[/list]
Manual + Q&A:
[list]
[*] Zoom - click on the black/white -/+ on the bottom corner map scale to change it/zoom in or out
[*] Pan the map - by pressing in the middle of the edges of the map
[*] Focus the map to coordinates - have no map tool selected and feed your coordinate keyboard with the coordinates you want to focus on
[*] Change color - Click on the 4 pencils in the bottom and the colors will be cycled. the pencil with shadow is the color that is selected. NOTE: you can not change color of something you already drawn!
[*] Draw a circle - Click on the top left "Compass" tool (when you see its shadow, you have it selected). You can draw a circle in a few different ways:
[list]
[*] First place where you want the center of the circle to be:
[list]
[*] Click on the map
Or
[*] Feed it coordinates with the first keyboard
[/list]
[*] Second define its radius:
[list]
[*] Click on the map how far out you want the radius to reach
Or
[*] Feed it coordinates with the first keyboard how far out you want the radius to reach
Or
[*] Feed the second keyboard with a range/radius
[/list]
[/list]
[*] Draw a Line - Click on the top left "Ruler" tool (when you see its shadow, you have it selected). You can draw a line in a few different ways:
[list]
[*] First place where you want the start of the line to be:
[list]
[*] Click on the map
Or
[*] Feed it coordinates with the first keyboard
[/list]
[*] Second define its end:
[list]
[*] Click on the map where you want it to end
Or
[*] Feed it coordinates with the first keyboard where you want it to end
Or
[*] Feed the second keyboard with a range and bearing
[/list]
[/list]
[*] Draw a Mark - Click on the top left "Pin" tool (when you see its shadow, you have it selected). You can draw a pin in two different ways:
[list]
[*] Define where you want your marker to be:
[list]
[*] Click on the map
Or
[*] Feed it coordinates with the first keyboard
[/list]
[/list]
[*] Select a plotted element - Have no tool selected and click on/near the plot. If you have two overlapping elements, you can keep on clicking to cycle between the two top most elements. If there is more than 2 overlapping elements then try to click further away or you might have to delete some of the more recent made elements to reach the 3rd below.
[*] Delete a plotted element - have no tool selected, select a element you want to be deleted, then click on the "eraser" in the top left. It will only delete the selected element and when selected element is deleted it will have no elements selected until you choose one again.
[/list]
Planned Features:
[list]
[*] Map tools icons looking more 3D
[/list]
Known Issues:
[list]
[*] Will not remember plots between restarts
[/list]